Have you been thinking of practical techniques on how to use ring sling? You’ve been having a hard time struggling with your ring sling, thinking if ring slings are meant for everybody?
Well, the good news is I’ve been there before, I still can remember my first time using a ring sling, it was an absolute disaster.
Back then I was so scared that I’ll hurt my little one as I couldn’t position him correctly but thanks to my girlfriend who taught me the proper technique on how to use a ring sling.
What Is A Ring Sling?
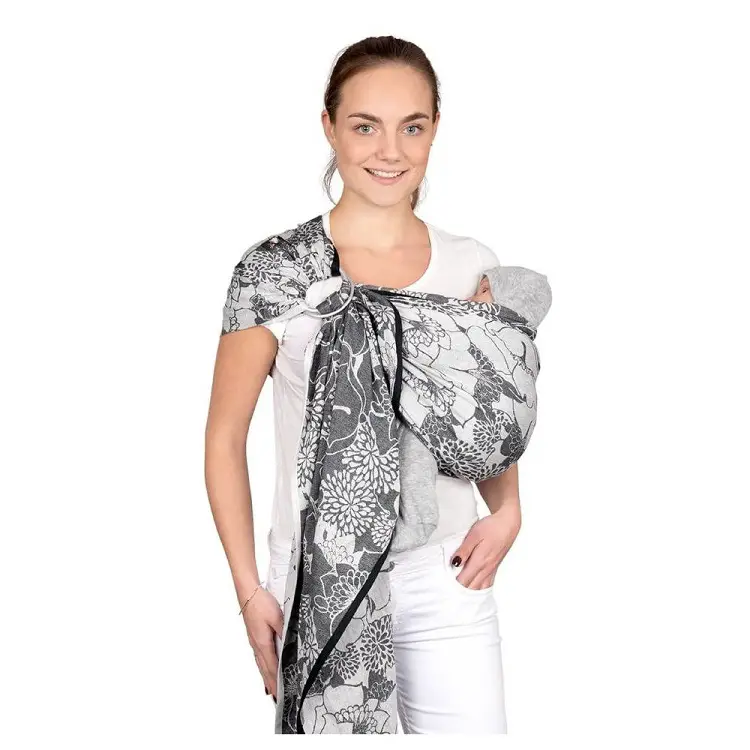
A ring sling is a long piece of fabric, most often linen, secured on the shoulder through a set of rings. Baby slings are a fun and practical way to dress your baby.
Ring slings provide a fast and convenient way of wearing your baby especially for house chores, and also those morning errands. More so, with no buckles, straps, and ties, it’s easy to pop your baby in and out several times a day.
These slings and pouches have been used since ancient times for a good reason. A study performed in 1986 found that the more an infant was carried, the less he/she cried. You can imagine what that did for survival during prehistoric times!
In general, worn babies tend to be happier than unworn ones, so why wouldn’t you sling? Well, maybe because at first sight, you ask yourself “How in the world is this one piece of fabric going to hold my little”? Now here’s how . . .
5 Reasons Why You Need A Ring Sling?
- Baby slings are a fun and practical way to keep your baby warm and happy.
- Ring slings provide a fast and convenient way of wearing your little one especially during house chores or morning errands.
- They’re perfect for breastfeeding.
- Ring slings are quick and easy to use. They are light and can fold up compactly, making it easy to throw them in a diaper bag.
- Also carrying your baby in a sling is great for development and can have similar effects on muscles as tummy time done on the floor.
Definitive Guide On How To Use Ring Sling
There are four practical steps to properly use a ring sling, which are thread, prep, sling, and adjust.
Step 1: Thread
For some people, this first step can be the most difficult but its main purpose is to ensure the sling is not twisted before you start.
- Firstly, with the fabric draping flat across your back, hold the rings over your shoulder in one hand with the safety tag facing down and the tail end in the other. It does not matter which shoulder the rings are on. Just ensure that the fabric is not twisted.
- Then bunch the fabric of the tail from top to bottom in one hand and pass the tail through both rings. The pockets should now face downwards, physically touching your shoulder.
- Flip the end of the tail so that the pockets face outward then pass this end through the bottom ring. This is quite similar to threading a belt.
- Pull the tail through, leaving some fabric bunched up between the rings.
- Slide both thumbs under this material and “finger-walk” your fingers through the fabric making sure to fan it out, smoothing any kinks that bunched up as you passed the tail through the bottom ring and, most importantly, positions the top and bottom rails on the outside so that they do not fold in. Rails are the hems on the long edges of the ring sling.
- Hold the tail by the top and bottom rails (left and right hems) and tug gently, flattening the bunched up material between the rings. Then continue tugging on the tail moving from the outside rails into the middle of the fabric. The fabric between the rings should now look flat and pleated but not twisted.
Some people think you have to re-thread every time you use the ring sling, but you don’t have to. The good thing about ring-slinging is that once threaded, you can throw the sling over your shoulder and start baby-wearing in under a minute.
You just have to make sure that the fabric threaded through the rings isn’t overlapping too much and that the top and bottom rail are placed top and bottom, not folded in on themselves. Well, if that’s the case, quickly finger-walk the material again just to smooth it out then pull the tail through the rings.
Step 2: Prep
Here you need to form a pouch for your baby to fit easily into place.
- Firstly, pull the bottom rail of your tail (right hem). This will pull the fabric lying closest to your body snug against your chest and upper abdomen. Try not to pull too tightly.
- Then raise your arm opposite the rings and bend your elbow close against your side inside the pouch. Grab the top rail with your hand and determine if the pouch is roomy enough or too roomy for the size of your baby.
- Finally, adjust by pulling the top rail of your tail (left hem) with your opposite hand.
Step 3: Sling
Now that you have set up the perfect size pouch for your baby to be placed into, next is to sling.
- Firstly, slide rings high on your shoulder or slightly behind your shoulder.
- Then pick up your baby and hold him in a high burp position on the shoulder opposite the rings.
- Slide your ring-side hand under the sling pouch and gently pull the baby’s feet under the pouch.
- Pull the top rail up, stretching the fabric up baby’s back.
- Tuck the fabric touching your body up and between the baby’s hips to form a seat for the baby’s bottom.
- Pull extra material starting near your armpit and across the baby’s back toward the rings and tighten by pulling the top rail of the tail down and back across the baby’s back.
Step Four: Adjust
Now it’s time for you and your baby to get comfortable.
- Lift baby’s bottom and at the same time pull the fabric down over your shoulder forming a capped shoulder.
- Pull the top rail once again to tighten any slack around the baby’s back.
- Reach behind you and pull the bottom rail down your back to make sure the fabric is smooth and flat. This ensures that the weight is well distributed across your body.
- Continue adjusting the top rail, bottom rail, lifting baby’s bum, and adjusting your capped shoulder until both of you feel very comfortable.
Checkpoints
Do ensure that you are slinging correctly by checking off the following security checkpoints.
- Your baby’s head is close enough to kiss.
- Your baby’s airways are open and her chin is off your chest.
- Legs are in the “M” position, bent at the knees with weight borne primarily in her bottom.
- Knees are higher than the baby’s bottom.
- Fabric forming the seat stretches from knee to knee.
- Fabric stretches flat across babies back with top rail at or above baby’s shoulder blades.
Alternatively, here is a tutorial video showing you how to use a ring sling carrier.
Who Needs A Ring Sling?
For me, ring slings are the easiest to use with newborns. Any parents that want to run a quick errand need a ring sling. Also, parents who have a baby or toddler that you would prefer to hold in a hip carry.
As you may know, most caregivers will want to carry your baby or child on your hip anyway. So, why not have a nice and supportive piece of fabric to assist you to do it and free up your hands?
Read Also: How To Wash A Tula Baby Carrier
How Old Does A Baby Have To Be To Be Worn In A Ring Sling?
Bear in mind, that each sling has its weight limit depending on the fabric and the age of the baby. Normally, 35 pounds is a good maximum baseline. Generally, you can wear a newborn in a ring sling right away.
Assuming there are no medical problems be sure to consult a doctor before officially wearing your little one in a sling just to be on the safer side. I wear my 17-month-old in a ring sling daily and I still feel very comfortable with him in it. He loves it so much.
How Do I Get One?
There are a lot of online stores where you can buy a ring sling. Preferably, you can easily buy one on amazon.com.
What Size Do I Need?
Be aware that people have different preferences in the length of their sling. Some people love a very short tail while some love the look of a longer tail or want to be able to use the tail material as a breastfeeding cover. However, the standard sling size is 72-74 inches. Most one-size slings fall in this range and this size sling fits the majority of wearers.
I remember when I bought my first sling I had people telling me to get an S/M (small/medium) because that’s the t-shirt size I wear, but I preferred an L/XL (large/extra-large) also known as long tails.
I prefer the long tails because they serve three purposes: the first is beautiful flowy fabric, the second is a makeshift nursing cover, and the third is extra support at the neck or bum or another layer of warmth for your little one. This is quite satisfying for longer tails even though it’s a personal preference thing.
Related Posts:
Baby Sling Care Instructions
- Cold wash in the laundry bag.
- May be machine-washed at the given temperature of no more than 30 º C.
- Do not bleach.
- Do not tumble dry.
- Cool iron only ( no higher than 110º C; Steam-ironing may be a risk)
- Do not dry clean or remove stains with solvents.
- Hang to dry in a cool surroundings away from direct sunlight.
Conclusion
Ring slinging can be for everyone, do not be discouraged, it just takes a little bit of knowledge and a lot of practice. When you properly sling, your hands are free to take care of other mom duties but most importantly, your little one feels safe and secure because he can see, hear, smell, feel and even taste you.
Kindly share or comment in the section below if you know any other technique on how to use ring sling.